Leave and overtime
This page contains two separate request journeys: leave and overtime. In both, the required outcome is that the employee has checked the request, the assigned approver has made the decision, and HR can see a clear final state before attendance closes.
Requester: the employee.
Decision owner: the manager or HR user assigned to the current approval step.
Role and access: employees can see only their own requests. The assigned manager or HR reviewer needs the approval and employee scope required for the request.
Product routes: employees use /me/leave and /me/overtime; managers or HR
review overtime at /operations/timekeeping?tab=timesheet&view=overtime under
Timesheet → Viewing: Overtime.
States to understand
Leave
| State | Meaning | Employee action |
|---|---|---|
| Pending approval | Submitted, with no final decision | Track it or choose Withdraw |
| Approved | Leave has been accepted | Take leave for the approved dates |
| Rejected | Leave was not accepted | Read the reason before creating another request |
| Cancelled | The employee withdrew a pending request | Create a new request only if leave is still needed |
Overtime
| State | Meaning | Next action |
|---|---|---|
| Pending approval | Registration is waiting for a decision | Track it or choose Cancel request |
| Approved | Overtime has been accepted | HR includes it in period-end review |
| Rejected | Registration was not accepted | Read the reason and agree any correction before resubmitting |
| Cancelled | The employee cancelled while pending | Do not use it for attendance closure |
| Paid | The overtime has passed through completed payroll | Reconcile it on the payslip if needed |
Employee: create a leave request
Open Personal → Employee Portal → Leave.
1. Check the balance
Before creating the request:
- Review Available, Used, and the amount reserved by pending requests for the intended leave type.
- If a carry-over balance exists, check its expiry date.
- Choose Create leave request.
Do not estimate the deduction by counting calendar days manually. The form uses the employee’s work schedule and applicable holidays.
2. Complete and review the request
- Select the Leave type and review the Available days.
- Enter From date and To date.
- Select the Day portion. A half day is valid only when the start and end are the same date.
- Wait for the requested duration to appear and review any holidays or rest days excluded from the calculation.
- Enter the Reason.
- Add Supporting documents when the leave policy requires them.
- Read the notice period, maximum consecutive days, and approval requirement.
- When the form has no error, choose Submit request.
Result to confirm: the request appears once in Leave request history. If approval is required, it shows Pending approval and the reserved balance is visible.
If the form reports insufficient balance, do not switch leave type merely to submit. Check the intended type, dates, and pending requests. HR adjusts a balance only against an approved basis.
Employee: withdraw pending leave
Only a Pending approval request shows Withdraw.
- In Leave request history, find the exact request.
- Choose Withdraw.
- Confirm the leave type and dates in the dialog.
- Choose Withdraw again.
- Confirm the state becomes Cancelled and the reserved balance is released.
If the action disappears, reload the list and read the latest state. Approved or rejected leave is no longer in the pending-withdrawal path.
Manager or HR: decide leave
The assigned approver opens HR → Approvals. HR may also work from Operations → Time policies → Leave → Leave requests.
- Filter Pending approval and select the employee.
- Review the leave type, dates, duration, reason, and documents.
- Reconcile the request with the work schedule and team coverage.
- To accept it, choose Approve and add a note when needed.
- To decline it, choose Reject and enter a reason the employee can act on.
- Confirm the request leaves the pending list and shows the decision.
After approval, the employee sees Approved and the balance moves out of the pending amount. After rejection, the reserved amount is released.
Employee: register overtime
Open Personal → Employee Portal → Overtime.
1. Review the applicable limits
Check This month, This quarter, and OT limits where shown. Rifena may warn or block according to the policy that applies to this employee; do not use one assumed limit for everyone.
2. Create the registration
- Choose Register overtime.
- Select the Date, Start, and End.
- If the end belongs to the following day, select Ends on the next day.
- Review the calculated duration.
- Read the displayed Multiplier. Night or holiday effects are determined by the employee’s shift and holiday calendar, not by an extra manual entry here.
- Enter the Reason.
- Read every warning or blocker, then choose Submit registration.
Result to confirm: the request appears once in Overtime history with Pending approval; This month, This quarter, and the limit summary refresh to include the submitted request.
If Rifena reports an overlap, review pending, approved, and paid registrations for the same date. Do not submit a duplicate as a retry.
Employee: cancel pending overtime
- In Overtime history, find the Pending approval request.
- Choose Cancel request.
- Confirm the overtime date.
- Choose Cancel request again.
- Confirm the state becomes Cancelled.
- Recheck This month, This quarter, and the limit summary; the cancelled request no longer remains in pending usage.
Cancellation cannot be undone. Create a new, verified registration if overtime is still required.
Manager or HR: decide overtime
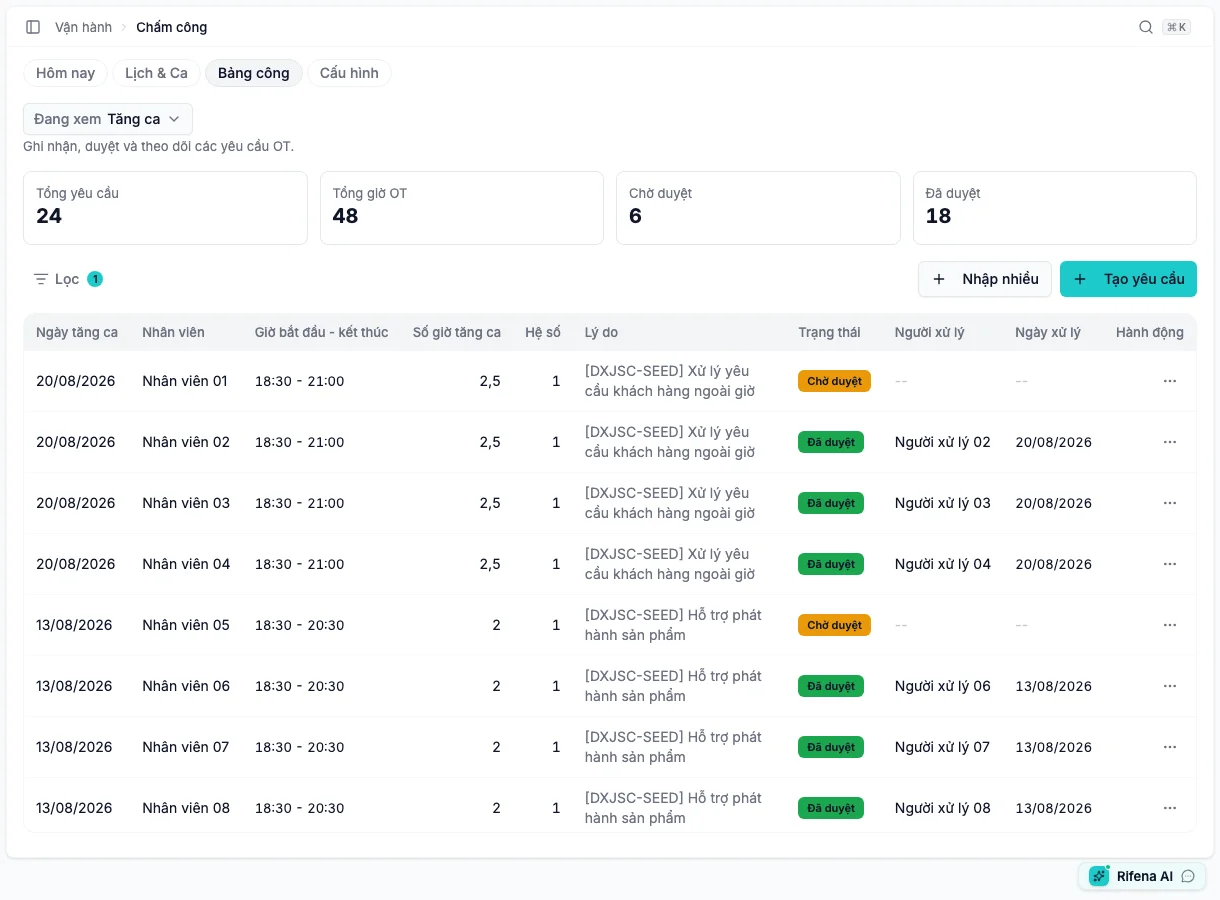
Open Operations → Timekeeping → Timesheet, then switch Viewing to Overtime.
- Filter Pending approval and open the request.
- Review the employee, date, start, end, hours, multiplier, reason, and current period totals.
- Reconcile it with the assigned shift and actual business need.
- To accept it, choose Approve and confirm Approve overtime.
- To decline it, choose Reject, enter a specific reason in Reject overtime, and confirm.
- Confirm the state becomes Approved or Rejected.
A useful rejection reason identifies the date, time, duration, or missing work basis. Avoid “invalid” when the employee cannot tell how to correct the request.
Hand over to attendance and payroll
Before HR chooses Close attendance:
- no leave request in the period remains Pending approval;
- no overtime registration in the period remains Pending approval;
- every approved request has the correct person, date, and duration;
- rejected or cancelled requests are not treated as period inputs.
Rifena blocks attendance closure while eligible leave or overtime remains pending. Continue with Run monthly attendance and then Run monthly payroll.
If the visible result is wrong
- Request missing after submission: reload history once and read the latest message; do not submit repeatedly.
- Withdraw or Cancel request missing: confirm the request is still Pending approval.
- The state changed but the hour summary did not: reload once and compare the correct month and quarter before escalating. Do not create or cancel another request merely to force the totals.
- Approver cannot see the request: check the current approval owner and their data access.
- Approved request missing from attendance: confirm the employee, date, and attendance period.
Use Leave and overtime support for the full recovery path.